This guide walks you through the steps to set up a trader in the Bazaar so you can sell items, including key tips on pricing and account limitations.
1. Preparing to Become a Trader
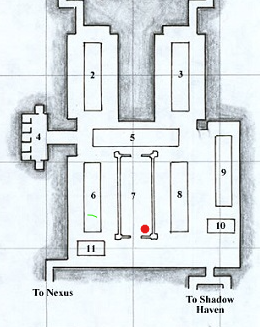
- Go to the Bazaar with the character (toon) you want to turn into a trader.
- Head to the RED dot on the provided map and speak to Merchant Tekrama.
- Buy Trader’s Satchels — they cost approximately 1pp each.
- Fill the Trader’s Satchels with the items you want to sell.
2. Setting Up Your Trading Spot
- Move to one of the designated trader areas (on the map: Areas 2, 3, 5, 6, 8, or 9).
- Type:
/trader - The Trader Panel will appear.
- For each item you wish to sell:
- Select the item.
- Enter the price in the price box at the bottom.
- Click Set Price.
- You will receive a confirmation notification.
-
Once all items are priced, click Start Trader in the bottom-right corner.
Important: This action immediately disconnects you from the server on that character. Your trader will remain online in offline mode, but you cannot log into that account without kicking the trader off.
3. Pricing Tips
- Prices are per item, not per stack.
Example: If you have a stack of 20 bone chips and set the price to 10pp, each chip will sell for 10pp (making the total price far too high).
Better approach: Set the price to 5g so the entire stack totals 10pp.
4. Multi-Account Selling
- You can run an offline trader on one account while playing your main character on another account.
- The trader must be on a second mule account (setup instructions available in the PQ Discord).
- You cannot have both accounts online at the same time on the same login.
- Item transfer options:
- Have a trusted third party help.
- Use the
#charactertransfercommand repeatedly.
5. Additional Commands
- Open Bazaar Price Check Window (while setting trader prices):
/baz